Synthetic teak decks

Hi Colle,

I was noticing on your pictures of Hippo in the dyneema discussion that you have some kind of aftermarket decking, as shown in this picture:


[score another point for Discourse making it so easier to copy your picture over to this message].

Would you mind telling me what it is, how you like it, how long you’ve had it, how easy it was to install, and how well it’s holding up?

The cabintop camber on N26s is a much bigger issue for footing and traction than on the larger boats, so I’m looking for something to go up there between the lines leading back to the cockpit.

Thanks,

– Bob
Me Gusta
Nonsuch e26U #233

Hello,

I installed them in 2022 and i wouldn’t do it again… they are a 3M backed product called AQUARM EVA. I made templates and cut each piece but to get the “boards” to line up there was a lot of waste. the “Wood” grain they had cut into the surface quickly disappeared and every time I washed Hippō I felt I was adding to the microplastic problem.

They also haven’t held up well, the higher traffic areas are already wearing through to the black under layer and not looking great. When I redo the decks again I’ll likely paint with non-skid. The petit ez-poxy and grit I used in the cockpit and other places not covered by the “teak” has held up much better and likely has a few more years before i will need to repaint.

Colle/ Hippō

In case of interest, I just installed SeaDek EVA synthetic decking on my cockpit seats only. The center seat for the helmsman is bare because I’m building a curved raised seat which will go there, also planned to be covered with the matching SeaDek material.

I regard this as an experiment, and don’t know yet whether I’ll be happy with it or not.

What I’d really like to do is improve the traction on my cabintop (which is much more heavily cambered on N26’s like mine than on the bigger Nonsuch models). I’d like to do that by adding decking. That would allow me to leave channels where the lines run, hopefully reducing the extent to which the lines can roll underfoot.

I don’t regard SeaDek or any EVA foam as adequate for the cabin top because I don’t think it’d hold up to that level of wear and tear.

I considered Stazo MarineDeck, a cork material, because of its good review from Practical Sailor, however ended up rejecting that alternative because it’s very expensive and the cork doesn’t have an excitingly attractive look.

I also considered Isiteek, which looked very promising with respect to both looks and price, but has only one U.S. distributor who has not responded for two months after promising to get back to me about the necessary adhesives. I can probably thank the tariff wars for that.

I’m also looking into NuTeak, which carries a 20-year warranty that sounds very promising. They turn out to be Canadian, so that may also get caught in the tariff mess. We’ll see.

PlasDeck, the best-known and first-referenced product, is made in the U.S. However, I can’t get their website to work and their warranty is the worst around. So, they’re a last resort as far as I’m concerned, and I’m not there yet.

I’ll keep posting on this topic as I learn more.

– Bob
Me Gusta
Nonsuch e26U #233

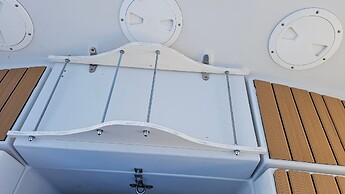
Update: I made a first cut at the helm seat, using spare materials I had on hand. It photographs better than it looks, and is not as comfortable as I’d like because the hump is too narrow.

I’ll show the process and the result for helmseat 1.0, and update when I have the new 2.0 version built.


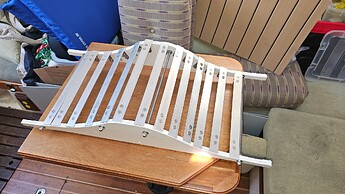
Step One: I laid two pieces about 4" wide and 26" long (dimensions of my N26 helm seat), on top of each other so that they’d match when I cut out a curve I’d worked out, then used threaded rod with bolts on each side to get them the right distance apart.

Then I used 1" aluminum bars, held with angled brackets, to make the top.

I had some spare 1/8th inch sign board from my dodger project that I fastened to the crossbars with 3M VHB (very high bond) tape, reinforced by punching holes and putting on stainless steel wire ties.
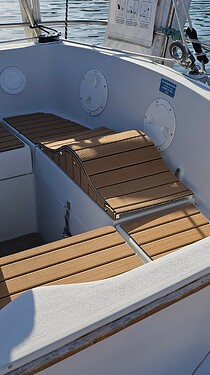
After that, I added the same Seadek material I’d used for the other cockpit seats, with this result.

Lessons learned: you want the seat base much wider unless you like riding camels. Also, a curve from the 4" height to near-flat in the distance available is much too sharp, and so also uncomfortable to sit on. Version 2.0 will be much simpler. It’ll be four inches high. The seat-top will have a 12" flat base, with 12" flat sides sloping down at about a 12-degree angle. That’ll make it 35.75" wide by my estimation, which will create about 5" overhang onto the cockpit corners. This actually is an opportunity to better secure it, because I can add some flip-down pieces that will fit into the spaces around the side hatches that will keep the seat from sliding forward.

Comments, advice, suggestions would be much appreciated.

– Bob

Bob,

That’s the first thing I was thinking when I saw the hump. Ouch!
Another option might be to keep the current setup as long as you can sort out how to keep it in place and add a stage two that is cut out underneath in the shape of the finished stage one and flat on top. That piece if well designed could double as a step stool and could be moved to the front of the helm when healing on a tack. All would need interlocking features designed in.
Just a fleeting thought. Nice work.

Brian