Sail track on carbon fiber masts (or, "Well, damn...")

I managed to forget advice I was responsible for helping to disseminate about not tightening the choker with the sail down.

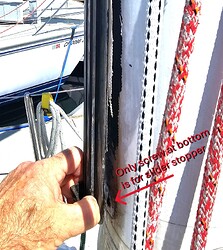
If there’s one thing I hate to see, it’s daylight between the mast and the sail track.

Mine is a carbon fiber mast.

My recollection is that the last person to have a mast track pull-out were the owners of Tetu, an N260. However, their set-up involved a stainless steel track slides at intervals to hold a Tides sail track.

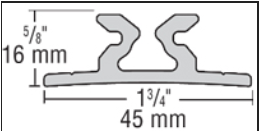
My set-up’s different. I’ve got what appears to be an OEM track that accepts Antal track sliders. The track has a very different profile from the 7/8” stainless track on most Nonsuches.

Anyone got any experience with that?

I’ve already got a query in to Mike Quill, but I’m interested in all the information and experiences from other folks that I can get.

Thanks,

– Bob

Oh no! That is a very sad thing to see. I think your chosen expletive was very mild under the circumstances.

Sorry, I know nothing about carbon fiber masts. What exactly was the failure mode? Screws pulling out? Sailtrack pad pulling off of the mast? (If it has a sailtrack pad…)

Failure mode was screws pulled out. No pads – the mast track is (was) directly affixed to the mast.

I’ll have to go back tomorrow and take a closer look. It appears that there was also some kind of caulking or adhesive that was pulled off, as well. I’m hoping that the ragged edges that show up if you blow up the pictures a bit are just mast paint and not carbon fiber laminate. Hopefully, that’s just late-night panic, and not a real problem.

– Bob

Hey Bob, please explain your comments about “not tightening the choker with the sail down”.

When I drop the sail into the sail pack I first tighten the topping lift, ease the choker, drop the sail and then tighten up the choker - not super tight but I do pull the w/boom aft to give some tension and ensure the w/boom rubber strips protect if the wishbone swings.

Are you saying I shouldn’t do that last tweak? Please elucidate.

Cheers, Neil
NS30U, #488
Kingston, ON

Neil,

The trick is knowing when enough is enough. If the sail’s down and choker is tightened just enough to keep the sail and cover tidy, no problem. But if the choker’s over-tightened, all the sail slides are concentrated on the small area at the bottom of the track, and thus the forces pulling on the track are entirely concentrated in that area rather than being distributed over the entire length of the track. Too much force, and the screws holding the track section corresponding to the stacked sail slides have to do all the work holding the slide.

The #$@%@!! problem is that the only way to know that you’ve pulled too hard is after it’s too late. So, when in doubt, remember that broken is an uglier look than slightly saggy.

The embarrassing issue in my case is that this is my second time around. I did the same thing on my first Nonsuch, so I should’ve known better. My problem this time is that I know what’s involved in retapping into aluminum but now I’m dealing with carbon fiber. Furthermore, on this boat, the track was screwed directly to the mast so I feel I need to be more careful about what holes are made in it. On my aluminum-masted first Nonsuch, this area has a spacer that’s banded to the mast and the screw holes are tapped into the spacer rather than the mast.

I think a good rule of thumb – which I’d violated – is to at most pull the choker hand tight when the sail’s down. I usually do that, but yesterday it didn’t look quite as tidy as I liked, so I put the line on the winch and cranked a rotation or two.

Sigh.

– Bob

Update: following is Mike Quill’s response to my query about the situation.

Hi Bob

I’d suggest removing the mast (I know…)

Remove that section of track from the mast and repair the holes that are pulled out with a suitable filler. Take the track to a machine shop and ask them to drill and countersink new holes in different locations from compromised ones. Reattach to the mast with screws and 5200 and if necessary use clamps to hold it in place while the 5200 dries.

Cheers

Mike Quill

I’m going to be trying to track down the factory (lots of changes since the mast was built, apparently) and a couple of other sources before I commit to a final course of action.

I’ll keep posting as I learn more, and still hope to hear from anyone else with carbon fiber mast experience.

– Bob

Wow! It should take a lot of force to pull that many screws out all together. What is their spacing?

The sail track on my boat, and which is apparently used on most of our aluminum masts, comes in 12 foot sections. Yours is a different track system, but does it also come in sections? Pulling a mast is an expensive proposition here in southern California. Maybe it would be possible to take off the lower section with the mast still in place. Awkward, for sure, but even if you have to hire help for that part it might save $1000 or more.

If you are able to remove just a lower section of track check it for bends. A tiny bend can cause a lot of sliding resistance. If you cannot straighten it, then you might want to replace it.

You can probably drill and countersink yourself, if necessary. The sailtrack on my mast doesn’t use countersunk screws. It’s stronger that way. If the track is stainless, use cobalt drills and countersink. (I got a very affordable set of cobalt countersinks somewhere last year, so they are available. ) Countersink slowly and check often so you don’t go too far.

Since the sail was down, it seems like most of the damage must be within reach. Use appropriate epoxy and filler for carbon fiber. If possible, make a tool with an “L" on the end and try to smear a little epoxy onto the inside surface of the mast. That will help spread the tension forces around the hole. If the pulled out holes are frayed, leave them that way to give the epoxy more to knit into. File flush when cured.

You might ask the mast manufacturer if it’s OK to use a larger diameter screw in that area. (Not in the original holes.) One size up can add a lot of pull out resistance. They will obviously have to work with the sail track, too, so your slides don’t hang up on them.

Good luck!

Went back yesterday, removed the sail and took a closer look. As a result I know a bit more.

There’s a bottom section to my mast track, which is the only part affected.

That bottom section of the track is 59", and was almost entirely glued on. There’s a pair of screws at the top of the section, another pair six inches below that, and a single screw at the bottom holding the slider stopper.

Beyond that, all that appears to be holding the track on is adhesive. Only that bottom screw has pulled out.

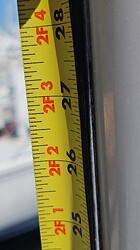
The track is peeled out from the bottom up to about 28". The mast paint stuck to the glue and pulled off, leaving bare carbon fiber underneath.

Based on this new information, Mike Quill’s now advising that I probably don’t have to pull the mast. :sweat_smile:

I’ve succeeded in tracking down the previous-previous owner, and determined that the mast was built by Composite Engineering in 2000. So, my next step is to contact them to see if they can figure out what adhesive and mast paint they used 25 years ago. Hopefully, with that info and their advice, I’ll be able to decide from there how to fix it. Stay tuned.

– Bob

Whew! So one screw and the paint adhesion failed. That makes a lot more sense. What might not make sense is putting on more of the same paint and gluing the track back down to it. Is it better for the paint to be the weak link (like a circuit breaker in wiring) or to have the glue be the failure point? You need to protect that carbon fiber (starting ASAP) but maybe you should either get a paint with adhesion greater than the glue or seal the CF with epoxy and then be sure and paint every exposed molecule of the epoxy to protect from UV. (Maybe paint over the epoxy up to the outline of the sail track, then glue down the track and leave a fillet of glue to slightly overlap the epoxy/paint line.)

Is the sail track bent?

Interesting, those two screws at the sail track joint. It looks like their purpose is to ensure that the two ends remain aligned so your slides don’t get stuck.

It’s still not great, but it looks like you dodged a very painful one!

Progress report:

I connected with Composite Engineering a few weeks ago and have been accumulating tools and materials for the job. Ted Van Dusen, the founder there, was a bit hard to reach but extremely helpful. He’s now 80, and has turned over the manufacturing side of his business to Moore Bros Company (https://www.moorebro.co/). So, I guess anyone needing new masts or wishbones should turn to them.

Ted gave me the following ten-step advice for the repair and shipped me the appropriate epoxy resin and hardener. I’m picking up the last bits of equipment I need tomorrow or Monday and will then begin the work.

Work should be done on a low humidity day, preferably at temperatures 70° or higher, which should give 15-30 minutes working time for the epoxy to be used. Use plastic wedges to keep track and mast apart while working.

5-6 straps, each capable of ensuring 10-30 lbs pressure, must be ready beforehand to put around mast after epoxy’s applied.

1. Clean mast and track with isopropyl alcohol before and after each sanding step

2. Use putty knives and sandpaper to remove all material adhering to the track

3. After material is removed:

  • a. Wipe down with isopropyl alchohol

    b. Scuff mast and track with 40 grit sandpaper where possible, 100 grit where coarser grade will not fit

    c. Perform final isopropyl alchohol wipedown

4. Mask sides with electrical tape, allowing slight additional space for flow-out

5. Prep epoxy for use immediately before work.

  • a. Mix ratio is absolutely critical. Parts to be mixed must be measured to 0.1 gram accuracy. Must have proper scale.

    b. Expect to have 15-30 minutes working time.

6. Apply layer of fiberglass tape and epoxy material, using thin brush and/or plastic card and/or tip of putty knife to apply. Ensure that epoxy is on both sides of fiberglass or do the fiberglassing as a prior step. Fiberglass must cover all parts of the mast showing as black to ensure that there is no contact between carbon fiber and aluminum track. Plan to fill in screw hole on mast at bottom point

7. Strap down mast track at 6 inch intervals to 10-30 lbs. pressure. Possible method is line tightened with turning pegs (which must be secured to prevent rotating loose).

  • a. Clean up excess epoxy squeeze-out with isopropyl alcohol immediately.

    b. Remove electrical tape masking

    8. Allow 24 hours minimum for epoxy to harden.

9. Determine whether bottom stopper screw has sufficient hold if put in only to depth of track. If not, drill and tap mast to allow the screw to penetrate further.

10. Remove straps, re-install sail.

This’ll be my first experience doing epoxy and fiberglass work, so wish me luck.

– Bob

I’ve been working with epoxy in many different situations and both commercially and privately since 1976. I’m pretty confident with it, but I’m still always very cautious in a new situation. It is amazing stuff if done right, but can fail in surprising ways and working with it is unlike anything else you’ve probably done. So what I’m getting at is: don’t trust to luck. Practice first. Mix some epoxy, soak some cloth, hang it on a vertical surface, see how it behaves. Screw a piece of aluminum bar to your vertical test surface and see what it takes to get it up behind there. Watch how it runs (and remember that you don’t want any starved joints, so you need to make sure the epoxy doesn’t run out of the upper end of the strip while you are positioning it.)

Be thorough in your preparation cleaning. There are things that epoxy does not stick to and you don’t want them in your joint!

He mentioned removing the masking, but not applying it. :slight_smile: You’ll want to mask the edges of your repair prior to doing your dry run. The rest can come at any time before you actually mix the epoxy. When it comes to the actual job, mask the hell out of everything. It’s not like painting. The stuff runs very freely and you need squeeze-out to ensure the fiberglass tape is well filled with epoxy. So plan to have epoxy running down your mast. Which really means, tape enough plastic sheeting below the repair so the squeeze-out will run down onto that and not your hardware or your deck. You’ll want to mask around your actual repair with electrical tape because the epoxy can wick beneath regular masking tape. Be sure and wipe the excess epoxy off of the masking before it sets, though, or it will be hard to get the tape off and you will be left with an ugly ridge where the edge of it was. The epoxy will begin to gel at the end of the working time and that’s when he suggests removing the tape. If that does leave a little ridge you can probably wipe it very gently with the corner of a credit card to burnish it down. Start in a less visible area to be sure you’ve got the hang of it and you might need to wait until the gel is at the right stage. I’m just kind of guessing because I’ve never done the exact repair you are doing. It’s just what I would be thinking of if I were doing it on my own mast.

Like so many jobs, preparation is the most important and most time consuming part of it. With epoxy the actual mixing and use will (and must) happen very quickly. So have everything masked, all tools and cleanup stuff at hand, etc.
Edit: include all parts of the process in your dry run including pretending to measure and mix the epoxy to ensure that everything necessary is at hand.

Do not under-mix the epoxy. Epoxy is a cross-linked plastic. You want to make sure that every bonding location gets connected, so mix until you are sure they all will. As you mix it you will see swirliness (my computer doesn’t think that’s a word, but it is now) due to diffraction between the two different components and possibly color differentiation. When mixed it will appear uniform and you will not see those diffraction swirls.
(You weigh the two parts because they are different densities and you need to make sure you really do get the exact correct proportions. And it is the difference between the two densities that creates the diffraction effect.)

Wear some of those blue disposable gloves and make sure they fit well. You don’t need gloves sliding around on your hands or bunching up on your fingertips when the clock is ticking.

Alcohol is nice for prep, but have some acetone on hand for emergency cleanup. You must clean up epoxy before it cures - preferably even before it gels. But don’t let the acetone wick into your actual joint.

Cleanup can be done with blue paper towels or cotton rags. Be sure you don’t leave lint behind, though. Epoxy soaked lint, when cured, becomes like little pokey needles. (Personal experience!) Acetone dissolves some plastics, so if you are inclined to use microfiber cloths, try soaking one in some acetone first to be sure it isn’t going to dissolve and smear a plastic coating over your deck or something.

Did he tell you which epoxy to use?
Thanks for all this really useful advice, Brian.

The additional level of detail you provided is very important to know, and greatly appreciated.

Van Dusen shipped me the epoxy and hardener, but has kept forgetting to answer my questions about the mix ratio. (I’m guessing 1-1, but was raised on the saying that “assume” makes an ass out of “u” and “me”, so I’m not doing a thing until I have an answer on that. Gotta call him first thing in the morning on Monday.)

He told me a story about problems he had once where he was installing a batch of tracks in 20-ft sections where three feet of attachment failed at one end or the other of every section, no matter where the sections were located on the mast. He said it traced back to the factory where the tracks had been made. It turned out that the pieces had been stored with three feet exposed near where some other work was being done. That work had left contaminants that got on the exposed sections, and that was enough to defeat the adhesion. He was very adamant about doing alcohol wipe, clean and prep, then alcohol wipe again – multiple times.

So, I get what you’re saying about importance of prep.

There’s a highly recommended local guy, and I’d gladly hire him to do the work. But, highly recommended local guys around here almost universally don’t feel the need to return phone calls.

– Bob

You can do it yourself. Just practice first to be sure you are really ready.

What sizes are the containers of epoxy that he sent you? That will probably tell you the ratio. Epoxy usually comes in 1:1 or 1:2. I expect that the kind he sent you is probably 1:2, but you are right to confirm it with him.

I don’t know how large of a batch of epoxy you will be mixing, but I find these 9oz. Solo cups to be ideal for smaller batches. (Up to maybe 7oz… 8oz. is pushing it a bit because you want some vigorous mixing going on. One nice thing about these is that they are crystal clear, making it very easy to see how well you have mixed the epoxy. They are also good because they give easy access to a paint brush. I don’t think I’d go out and buy them for just one job, but they used to be ubiquitous in offices and catering environments. (I bought a Costco size lot of them years ago and still have 3 or 4 around.)

Don’t re-use the cups until the remnants in it are fully cured. (For just one job, just toss them!) Otherwise, if you mix a new batch while the partially cured remnants are still in there they will change you working time and probably the strength.

If you can’t find a few of these cups around, Home Depot has mixing cups. They are expensive and have all kinds of printing all over them, making it hard to see when the two parts are adequately mixed, but they will work.

And if you mix too much epoxy, don’t let it sit in the mixing cup. Epoxy is exothermic, meaning it generates heat as it cures. One of these cups, half full of epoxy, can get extremely hot if allowed to cure and can damage what it is sitting on. I’ve never seen it catch fire, but I have seen it bubble and make noises like a juvenile dragon trying to learn how to light it’s breath. And that breath (the fumes generated by this heat) is noxious. Best to pour your excess out onto a surface where it can spread out. Do this at the end of your working time so it will still pour. A cookie sheet lined with some thick Visqueen and some paper towels to spread it around and keep it from settling to one corner is what I usually use. Thought it’s best to mix the right amount in the first place.

You might actually find that cookie sheet to be handy in wetting out the fiberglass tape, too.

I can’t begin to tell you how much I appreciate the detailed advice you’re giving me, Brian!

I talked to Ted Van Dusen at Composite Engineering this morning. The mix ratio turned out to be 100 resin to 47 hardener. Glad I asked.

Despite the delays in getting an answer on this, I’ve really got to say I’m impressed with the customer care. They made this mast over 25 years ago, and they’ve spent over two hours on helping me as well as sending the materials at cost.

I was told that the mix was intended to produce a strong but flexible bond to reduce the risk of pull-out.

Van Dusen also recommended that the error be kept to plus-or-minus 1%, so I gotta get me a better scale. Two mail-order places I’ve had a lot of good luck with for tools, parts, and materials are Zoro.com and MSCDirect.com. I found a digital bench scale with 500 gram capacity that measures down to tenths of grams at Zoro for $50.29, should get it tomorrow.

– Bob

Just returning the favor.

Looks like a 2:1 (by volume) epoxy. That’s close enough for most things. But your application is critical, so the precision he demands is important.

Spent a couple hours this afternoon taping protective sheeting and electrical tape all around, then started alcohol wiping and sanding.

The think I’m now really worried about it is how to sand, clean, and fill the part of the track and mast closest to the top, above which it’s still adhering to the mast.

Ted Van Dusen suggested going down from 40 grit to 120 grit sandpaper at the top, because the thinner sandpaper will get in the tighter crack. But, it doesn’t get all the way in. And, that doesn’t solve the question of how a get an alcohol wipe and a tack cloth in there to clean up. Nor is it clear how I get a fiberglass layer and enough epoxy in there. Ted suggested wetting a putty knife with epoxy and using that, but I’m concerned it’ll push the separation up further.

My current thinking is to get some very thin t-shirt and other rags for the second round tomorrow. Later, when I get to the glass and epoxy, I’m figuring I’ll just get the glass as high up as I can, try to get as much epoxy up as close as I can, and then place the first tightening strap a few inches below that point in the hopes the pressure will push epoxy up.

Love to have better advice if that’s not the right plan.

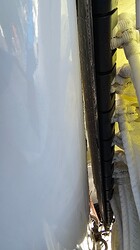
Below is a picture of the mast and other stuff covered with protective plastic. Haven’t done the deck yet, probably won’t until I’m actually doing the epoxying work, because it feels like a slipping hazard.

– Bob

Maybe you should do a practice glue-up at home with a stiff piece of aluminum screwed onto a piece of 10” ducting or something, in order to work out these details. Use some general purpose epoxy, not the special stuff Van Dusen sent unless he sent a lot of it. (BTW, epoxy keeps well in a cool dark place, so if there is excess you might want to keep it for future issues.)

I’ve never repaired a CF mast, so all I can give you is general epoxy knowledge. But here are some more thoughts.

I went back and looked and you said the glue pulled the paint off of the mast leaving bare CF. But Van Dusen is advising epoxy, which suggests that the coating was more integral to the mast than mere paint. Was there fiberglass cloth embedded in the coating that got lifted? If not, I’m curious why he wants you to use fiberglass tape in the repair. Maybe he’s just worried that without the tape the epoxy will be more likely to run out of the joint, but it is curious.

If I were doing this I would be inclined to follow at least the first part of Mike Quill’s advice which is to remove the rest of the track - if you can do so without further damaging the mast. (By slicing away the glue if it is something like 5200.) That would also give you a chance to straighten the track, which I assume is probably kinked. If you leave it kinked and rely on the glue to hold it down it will constantly be putting the glue in tension. But that’s just me. Van Dusen would know way more about this than I do, so maybe it doesn’t matter.

An old linen handkerchief is pretty thin. I don’t think my cheapos are any thicker than fine sandpaper. You can get packets of them on Amazon for almost nothing. You’ll have to cut off the sewn edges.

Once you have it sanded and cleaned as high as you can go there is the matter of getting epoxy way up there into the narrow part of the joint. A handkerchief should be thinner than the fiberglass tape. You might be able to wet it out with epoxy and use it kind of like a really thin paintbrush to smear it way up in there.

And here’s a thing to consider: If you put some epoxy between two surfaces and mush them together, the epoxy squishes out in all directions. If you get a good blob of epoxy as high as possible in your joint and then squish it closed, some of the epoxy will squish up into the tapered part. Most won’t because the taper will want to push it down, but some will squish upwards. Doing this repair without removing the rest of the track probably means you will have a short bit of it that is glue-starved. It looks like it will be about in the middle of the track section, which is probably the best place to have a weak section, so it probably will never cause a problem.

You might want to tape on a plastic “skirt” below your repair area and then staple an old towel onto it to absorb the runoff. If you think having plastic on the deck is slippery, you don’t even want to think about having epoxy on the plastic. It really is very inconsiderate in its habits and will try to go wherever you don’t want it. So plastic on the deck at the last minute is not a bad idea, but best to catch it up as close to the joint as you can.

Practice run sounds very well-advised.

There was cloth that got lifted. The purpose of the fiberglass tape is to ensure a barrier between the carbon fiber and the aluminum track. According to Ted, there’s a 0.9V difference between carbon and aluminum that will turn the track into a sacrificial anode if not separated.

I suppose I could remove the whole 59” bottom section of track. The adhesion seems pretty strong, though, so I’d want to be very careful.

With the sail down and the slides stacked on the bottom 24-26”, the forces exerted by the choker were acting on about 5% of the 41.5’ track. That pulled the track only about 0.25” away from the mast.

So, the track doesn’t appear to be kinked and I infer that the adhesion’s generally pretty strong.

Note: many of the Nonsuches have 7/8th inch stainless steel track that’s about an 1/8th of an inch thick. I don’t. I have an anodized track which I haven’t identified yet, but looks similar to Harken’s System B Flanged mast track shown in these two pics.

I don’t think this is exactly what I have, but the dimensions are very similar. Not prone to kinking.

So, I’m thinking if I take your advice about the linen handkerchiefs – and definitely the “sop-up” towel stapled on – that maybe I’ll be ok.

Thanks again, Brian!

– Bob

I guess I’ve never been clear on one thing. What is the “glue” that holds the track to the mast? The CF in your mast is covered by a layer of epoxy impregnated fiberglass. This is a normal way to put a barrier coat of epoxy over cold molded and stitch&glue boats, and I’ve read that it is normal to put such a barrier coat over CF. But it seems unlikely to me that your sailtrack was epoxied to the mast in that same step. Was it epoxied on separately? Or is the glue something like 3M-5200 or Sikaflex 291?

If the track was originally epoxied to the mast, then the repair you are doing makes sense. But if the mast was completed and finished and then the sailtrack was glued on with some other kind of glue, then I’m not so sure you want to epoxy it directly to the CF substrate. That is quick and dirty, but is it really the best way to go about it if you want to keep the mast long-term?

If the glue is not epoxy, then I really think the smart thing would be to remove the track, repair and finish the mast, then re-glue the track back on with the correct glue. It will be easier to do the actual repair and if you are meticulous about it you will end up with a like-new section of mast there.

There are chemicals which can help you remove adhesives, but you need to know what adhesive they used. And heat will soften epoxy, though you’d want to be very careful about this so you don’t overdo it. Mike Quill might have some better ideas about how to remove it. He’s a pro at this kind of thing. I agree that you want to be careful so you don’t rip off any more of the barrier coat. That might be why Van Dusen has you doing the repair without removing the track. So be careful.

Once off you will want to sand back to where the barrier coat is still attached to the CF. But be careful that you don’t sand into the CF. This is the highest stress part of the mast so treat each carbon fiber as if it is precious.

I started off with epoxy advice which I am fairly confident in. But we’re really getting away from that and into how to repair a CF mast. I hope you are also continuing to involve Mike Quill or Van Dusen in this and not relying solely on my advice! I’m confident that I could fix it if it were my own boat and I was using my own hands. But I’d be analyzing and figuring out everything with the problem in front of me and adapting as I went along. I can’t do that here.